-
[Android] 메모장 앱 만들기(2)_Realm DB에 데이터 추가하기Android 2020. 4. 24. 15:39
지난 시간은 DB와 연결했다면 이번에는 실제로 메모 작성 페이지와 리스트를 보여줄 예정입니다.
먼저, 메모작성 후 데이터들을 보여줄 recyclerview를 사용해봅시다.
1. Recyclerview 사용하기
build.gradle의 dependencies에 recyclerview 모듈을 넣고 Sync Now를 해줍니다.
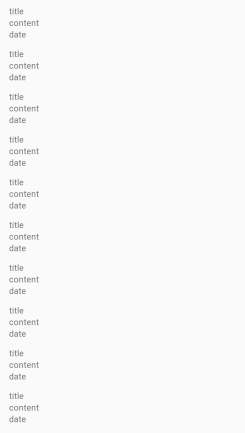
implementation 'androidx.recyclerview:recyclerview:1.0.0'그리고, memo_item.xml 레이아웃을 생성해 recyclerview에 들어갈 아이템 구조를 만들어줍니다. 간단하게 제목, 내용, 날짜 데이터를 뿌려줄 텍스트뷰로만 구성했습니다.
<?xml version="1.0" encoding="utf-8"?>
<LinearLayout xmlns:android="http://schemas.android.com/apk/res/android"
    android:id="@+id/memoitems"
    android:layout_width="match_parent"
    android:layout_height="60dp"
    android:layout_marginLeft="10dp"
    android:layout_marginTop="10dp"
    android:layout_marginRight="10dp"
    android:orientation="vertical">
    <TextView
        android:id="@+id/mtitle"
        android:layout_width="wrap_content"
        android:layout_height="wrap_content"
        android:layout_marginLeft="10dp"
        android:text="title"/>
    <TextView
        android:id="@+id/mcontent"
        android:layout_width="wrap_content"
        android:layout_height="wrap_content"
        android:layout_marginLeft="10dp"
        android:text="content"/>
    <TextView
        android:id="@+id/mdate"
        android:layout_width="wrap_content"
        android:layout_height="wrap_content"
        android:layout_marginLeft="10dp"
        android:text="date"/>
</LinearLayout>
이제 activity_main.xml에 적용해 봅니다. androidx.recyclerview.widget.RecyclerView를 사용해 아이템들을 넣어줍니다.
<?xml version="1.0" encoding="utf-8"?>
<androidx.constraintlayout.widget.ConstraintLayout
    xmlns:android="http://schemas.android.com/apk/res/android"
    xmlns:app="http://schemas.android.com/apk/res-auto"
    xmlns:tools="http://schemas.android.com/tools"
    android:layout_width="match_parent"
    android:layout_height="match_parent"
    tools:context=".MainActivity">

    <androidx.recyclerview.widget.RecyclerView
        android:id="@+id/recycler_view"
        android:layout_width="match_parent"
        android:layout_height="match_parent"
        tools:listitem="@layout/memo_item">
    </androidx.recyclerview.widget.RecyclerView>

</androidx.constraintlayout.widget.ConstraintLayout>
그럼 아래와 같이 작성한 memo_item이 들어가게 됩니다.
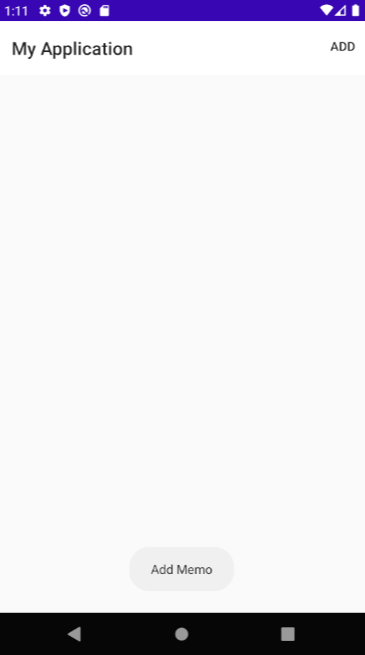
2. 앱에 ADD 버튼 추가하기
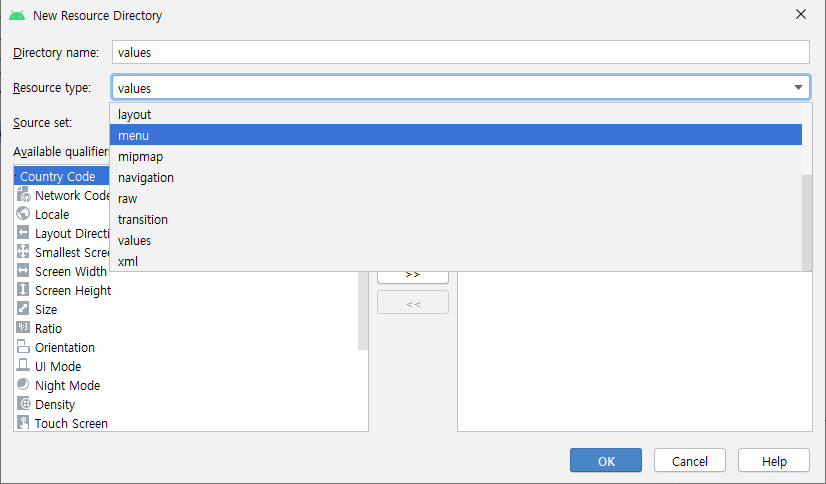
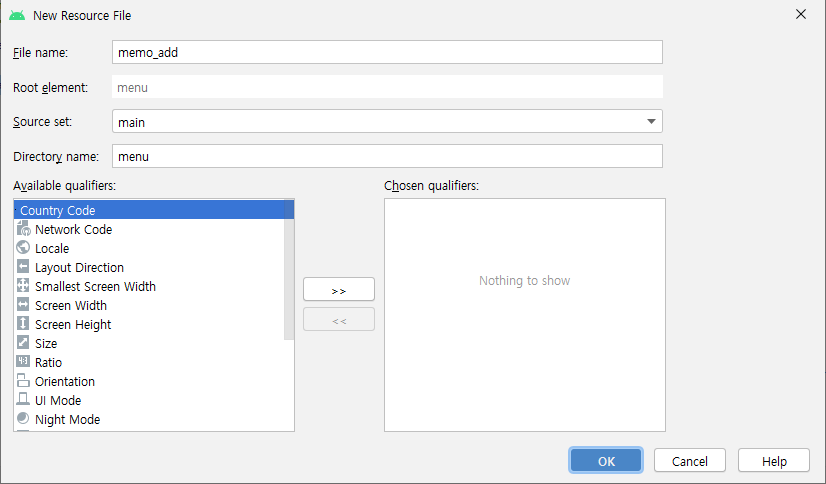
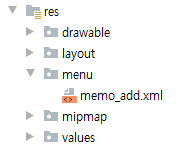
activity_main.xml에 버튼을 추가합니다. menu를 사용하겠습니다. 아래 처럼 res우클릭 > new > android resource directory에서 menu로 만들어주고, 그 아래에 다시 memo_add.xml 파일을 만들어줍니다.
클릭할 item 하나를 추가해줍니다.
<?xml version="1.0" encoding="utf-8"?>
<menu xmlns:android="http://schemas.android.com/apk/res/android"
    xmlns:app="http://schemas.android.com/apk/res-auto">
    <item
        android:id="@+id/action_add"
        android:title="Add"
        app:showAsAction="ifRoom"/>
</menu>
MainActivity에 메뉴버튼을 동작할 수 있도록 넣어줍니다.
    @Override
    public boolean onCreateOptionsMenu(Menu menu) {
        // Inflate the menu; this adds items to the action bar if it is present.
        getMenuInflater().inflate(R.menu.memo_add, menu);
        return true;
    }

    @Override
    public boolean onOptionsItemSelected(MenuItem item) {

        int id = item.getItemId();
        // 앱 정보 나타내기
        if (id == R.id.action_add) {
            Toast.makeText(getApplicationContext(), "Add Memo", Toast.LENGTH_SHORT).show();
        }
        return super.onOptionsItemSelected(item);
    }
그리고 앱 상단에 툴바를 추가해서 버튼이 더 잘 보이도록 해주겠습니다. activity_main.xml
<?xml version="1.0" encoding="utf-8"?>
<androidx.constraintlayout.widget.ConstraintLayout xmlns:android="http://schemas.android.com/apk/res/android"
    xmlns:app="http://schemas.android.com/apk/res-auto"
    xmlns:tools="http://schemas.android.com/tools"
    android:layout_width="match_parent"
    android:layout_height="match_parent"
    tools:context=".MainActivity">
    <RelativeLayout
        android:layout_width="wrap_content"
        android:layout_height="wrap_content"
        tools:ignore="MissingConstraints">
    <include
        android:id="@+id/toolbarInclude"
        layout="@layout/toolbar"
        android:layout_width="match_parent"
        android:layout_height="wrap_content" />
    <androidx.recyclerview.widget.RecyclerView
        android:id="@+id/recycler_view"
        android:layout_below="@+id/toolbarInclude"
        android:layout_width="match_parent"
        android:layout_height="match_parent"
        tools:listitem="@layout/memo_item">
    </androidx.recyclerview.widget.RecyclerView>
    </RelativeLayout>
</androidx.constraintlayout.widget.ConstraintLayout>
이때, res > values > styles.xml에 AppTheme설정을 NoActionBar로 바꿔줘야 합니다. (툴바를 적용시키기 위함)
<style name="AppTheme" parent="Theme.AppCompat.Light.NoActionBar">그리고 MainActivity에 툴바를 적용하는 코드를 작성합니다.
 Toolbar toolbar = (Toolbar) findViewById(R.id.toolbar);
 setSupportActionBar(toolbar);
실행하면 상단에 버튼이 보이고, 클릭하면 메세지가 뜹니다.
3. 데이터 추가 동작 : MemoActivity 작성하기
이제 본격적으로 동작하는 기능을 구현해 봅니다. 버튼을 누르면 메모를 쓰는 페이지가 나오게 하고, 그것을 저장하면 다시 메인의 리스트에 추가되도록 구현할 예정입니다.
1) MemoActivity.java
메인에서 버튼을 눌렀을 때 메모작성 페이지로 이동하도록 해줍니다. intent를 사용하여 넘깁니다.
  @Override
    public boolean onOptionsItemSelected(MenuItem item) {

        int id = item.getItemId();
        // 앱 정보 나타내기
        if (id == R.id.action_add) {
            Toast.makeText(getApplicationContext(), "Add Memo", Toast.LENGTH_SHORT).show();
            Intent intent = new Intent(MainActivity.this, MemoActivity.class);
            startActivityForResult(intent, 1);
        }
        return super.onOptionsItemSelected(item);
    }
MemoActivity에 연결되는 화면인 Memo_write.xml을 생성하여 레이아웃을 작성합니다.
<?xml version="1.0" encoding="utf-8"?>
<LinearLayout
    xmlns:android="http://schemas.android.com/apk/res/android"
    xmlns:app="http://schemas.android.com/apk/res-auto"
    xmlns:tools="http://schemas.android.com/tools"
    android:layout_width="match_parent"
    android:layout_height="match_parent"
    android:orientation="vertical"
    tools:context=".MainActivity">
    <include
        android:id="@+id/toolbarInclude"
        layout="@layout/toolbar"
        android:layout_width="match_parent"
        android:layout_height="55dp" />
    <TextView
        android:id="@+id/date"
        android:layout_width="wrap_content"
        android:layout_height="wrap_content"
        android:textSize="18.00sp"
        android:textStyle="bold"
        android:layout_marginTop="20dp"
        android:layout_marginLeft="10dp"
        tools:text="오늘날짜 : 2019/01/01" />

    <TextView
        android:id="@+id/event"
        android:layout_width="wrap_content"
        android:layout_height="wrap_content"
        android:layout_marginTop="10dp"
        android:textSize="18.00sp"
        android:ems="10"
        android:textStyle="bold"
        android:layout_marginLeft="10dp"
        tools:text="제목" />

    <EditText
        android:id="@+id/title"
        android:layout_width="300dp"
        android:layout_height="wrap_content"
        android:layout_marginLeft="10dp"
        android:layout_marginTop="10.00dp"
        android:hint="제목을 입력하세요"
        android:inputType="textCapWords"
        android:padding="10dp"
        android:textColor="#000000"
        tools:ignore="MissingConstraints" />
    <TextView
        android:id="@+id/event1"
        android:layout_width="wrap_content"
        android:layout_height="wrap_content"
        android:layout_marginTop="10dp"
        android:textSize="18.00sp"
        android:textStyle="bold"
        android:layout_marginLeft="10dp"
        tools:text="내용" />

    <EditText
        android:id="@+id/content"
        android:layout_width="match_parent"
        android:layout_height="match_parent"
        android:layout_marginLeft="10dp"
        android:layout_marginTop="10.00dp"
        android:hint="내용을 입력하세요"
        android:inputType="textMultiLine"
        android:padding="10dp"
        android:gravity="start"
        android:textColor="#000000"
        tools:ignore="MissingConstraints" />
</LinearLayout>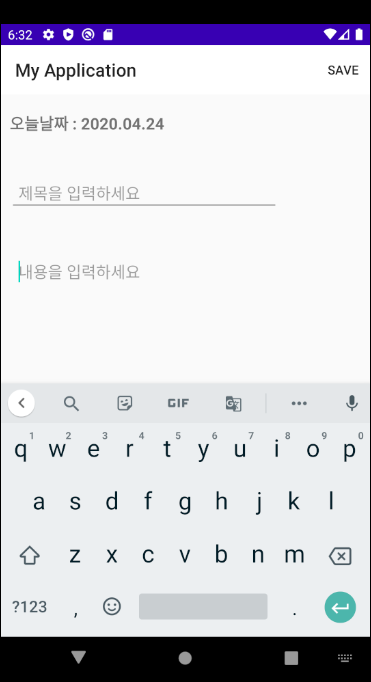
오늘 날짜는 Date와 SimpleDateFormat을 사용하여 받아오도록 합니다. (형식 변환) MemoActivity.java
  tvDate = findViewById(R.id.date);
        Date d = new Date();
        SimpleDateFormat sdf = new SimpleDateFormat("yyyy.MM.dd");
        tvDate.setText("오늘날짜 : "+sdf.format(d));
그리고 메뉴버튼 동작에 intent로 메인으로 전달하도록 코드를 작성합니다.
    @Override
    public boolean onCreateOptionsMenu(Menu menu) {
        // Inflate the menu; this adds items to the action bar if it is present.
        getMenuInflater().inflate(R.menu.memo_save, menu);
        return true;
    }

    @Override
    public boolean onOptionsItemSelected(MenuItem item) {

        int id = item.getItemId();
        // 앱 정보 나타내기
        if (id == R.id.action_save) {
            Toast.makeText(getApplicationContext(), "Save Memo", Toast.LENGTH_SHORT).show();
            titles = title.getText().toString();
            dates = tvDate.getText().toString();
            contents = content.getText().toString();
            Intent add = new Intent(MemoActivity.this, MainActivity.class);
            add.putExtra("title",titles);
            add.putExtra("date",dates);
            add.putExtra("content",contents);
            setResult(RESULT_OK,add);
            finish();
        }
        return super.onOptionsItemSelected(item);
    }
2) MemoAdapter.java
memo_item을 recyclerview에 담기 위해 Adapter를 만들어줍니다.
package com.example.myapplication;

import android.app.Activity;
import android.view.LayoutInflater;
import android.view.View;
import android.view.ViewGroup;
import android.widget.TextView;

import androidx.annotation.NonNull;
import androidx.recyclerview.widget.RecyclerView;

import java.util.List;

import io.realm.Realm;

public class MemoAdapter extends RecyclerView.Adapter<MemoAdapter.ViewHolder> {
    public Activity activity;
    private List<Memo> memoList;
    private Realm realm;
    public MemoAdapter(Activity activity, List<Memo> memolist) {
        this.activity = activity;
        this.memoList = memolist;
    }

    @NonNull
    @Override
    public MemoAdapter.ViewHolder onCreateViewHolder(@NonNull ViewGroup parent, int viewType) {
        View view = LayoutInflater.from(parent.getContext()).inflate(R.layout.memo_item, parent, false);
        ViewHolder viewHolder = new ViewHolder(view);
        return viewHolder;
    }

    @Override
    public int getItemCount() {
        return memoList.size();
    }
    class ViewHolder extends RecyclerView.ViewHolder {
        TextView mtitle, mdate, mcontent;
        public ViewHolder(final View itemView) {
            super(itemView);
            mtitle = itemView.findViewById(R.id.mtitle);
            mdate = itemView.findViewById(R.id.mdate);
            mcontent = itemView.findViewById(R.id.mcontent);
        }
    }
    @Override
    public void onBindViewHolder(@NonNull MemoAdapter.ViewHolder holder, int position) {
        Memo data = memoList.get(position);
        holder.mtitle.setText(data.getTitle());
        holder.mdate.setText(data.getDate());
        holder.mcontent.setText(data.getContent());

    }
}
ViewHolder를 통해 Memo 객체에 접근하여 데이터를 가져오고, 다시 item에 뿌려줍니다.
3. RealmDB에 데이터 저장하기
이제, 준비는 끝났습니다. 이제 MainActivity에 RealmDB와 연결하는 코드를 넣어줍니다.
처음에 adapter를 넣고, 메모 데이터가 들어갈 리스트를 선언해 줍니다.
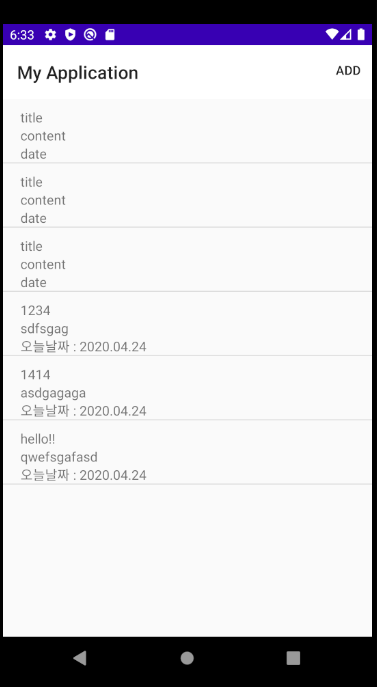
  private MemoAdapter memoAdapter;
  public List<Memo> mlist = new ArrayList<>();
onCreate에 RealmResult로 메모에 저장된 객체들을 모두 가져와 리스트에 넣어주는 코드입니다. memoAdapter를 사용하여 recyclerview에 추가합니다.
 RealmResults<Memo> realmResults = realm.where(Memo.class)
                .findAllAsync();
        for (Memo memo : realmResults) {
            mlist.add(new Memo(memo.getTitle(), memo.getDate(), memo.getContent()));
            memoAdapter = new MemoAdapter(MainActivity.this, mlist);
            rcv.setAdapter(memoAdapter);
        }
그리고 MemoActivity에서 intent로 넘겨준 값들을 Realm DB에 저장하는 동작을 해줍니다.
realm에 Memo클래스를 만들고, 넣어준 후 list에 넣고 adapter로 recyclerview에 순서대로 값을 넣어줍니다.
@Override
    protected void onActivityResult(int requestCode, int resultCode, Intent data) {
        super.onActivityResult(requestCode, resultCode, data);

        if (resultCode == RESULT_OK) {
            String title = data.getStringExtra("title");
            String date = data.getStringExtra("date");
            String content = data.getStringExtra("content");
            Toast.makeText(this, title + "," + content, Toast.LENGTH_SHORT).show();

            realm.beginTransaction();
            Memoinfo = realm.createObject(Memo.class);
            Memoinfo.setTitle(title);
            Memoinfo.setDate(date);
            Memoinfo.setContent(content);
            realm.commitTransaction();

            mlist.add(new Memo(title, date, content));
            memoAdapter = new MemoAdapter(MainActivity.this, mlist);
            rcv.setAdapter(memoAdapter);

        }
    }
이제 실행해 보면, 저장한 값이 리스트로 보이는 것을 확인할 수 있습니다.
이렇게 간단한 메모장 레이아웃과, 데이터를 DB에 추가하는 기능을 구현해봤습니다.
다음 시간에는 저장한 데이터들에 접근해서 수정하고 삭제하는 동작을 구현해 볼 것입니다.
'Android' 카테고리의 다른 글
[Android] 메모장 앱 만들기(3)_Realm DB 데이터 수정 및 삭제 (0) 2020.04.28 [Android] 메모장 앱 만들기(1)_Realm DB 연동하기 (0) 2020.04.23 [Android] 현재위치 GPS정보 받기( + Firebase 연결) (1) 2019.10.24 [Android] UUID로 Miband2 정보 가져오기 (0) 2018.11.23 [Android] Wifi정보 출력 (0) 2018.11.23